Home to training index page > Content Management System (CMS) trainings > Introduction to WordPress
WordPress is one of the most widely used content management systems in the world, with over 40% of all websites built on this platform. It is a powerful and flexible tool that can be used to create websites of all types, from simple blogs to complex e-commerce sites. In this online training, we will cover everything you need to know to get started with this CMS, from installation and setup to creating and customizing your own website.
Chapter 1: Getting Started with WordPress
In this chapter, we will cover the basics, including installation, setup, and configuration. We will also discuss the different types of hosting available and how to choose the right one for your needs.
Section 1: Installing WordPress
To install this CMS, you first need to choose a hosting provider and a domain name. Many hosting providers offer one-click installations, which makes the process much easier. There are myriad ways to get this tool onto your hosting server. In fact, because the platform is so popular, many hosts have dedicated ‘auto installer’ software to help you.
Installing WordPress on InfoManiak
- Open the Manager (manager.infomaniak.com)
- Go to Web Hosting
- Click on the hosting/domain name in question
- On the left-side menu, click on My Sites
- click on WordPress & Apps
- click on + New application
- select WordPress and click on Install


Install WordPress on HostGator One Click
- Log into your Customer Portal
- Click ‘Create Website’
- Click ‘Get Started’ on the page that opens
- HostGator will install it for you
- You’ll see your new WordPress login credentials
- Copy your new login details
- Click ‘Go to WordPress’
- Paste your new login details to log into your new account
Section 2: Setting Up Your Site
Once you have installed this CMS, it’s time to set up your site. This includes choosing a theme, setting up your pages and posts, and customizing your site’s appearance.
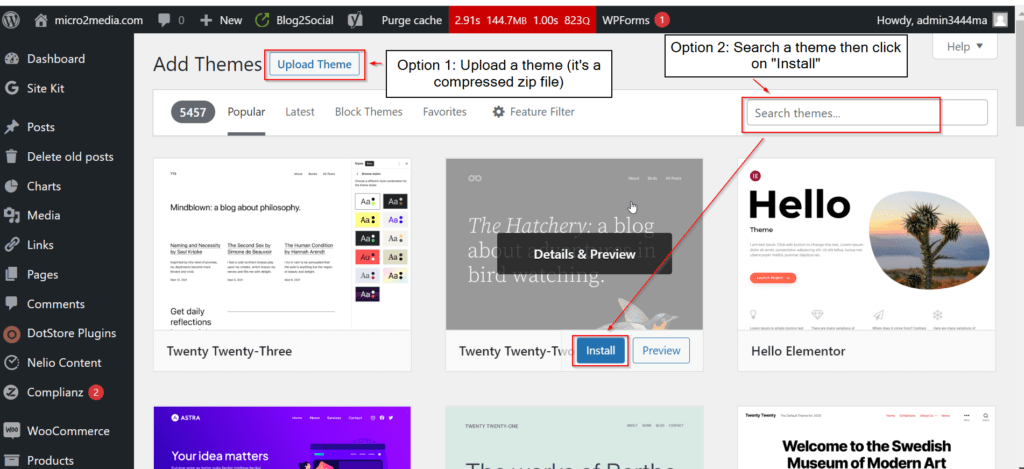
- Choose a theme for your site. You can do this by navigating to the “Appearance” section in the dashboard and clicking “Themes.” From here, you can browse and install different themes.
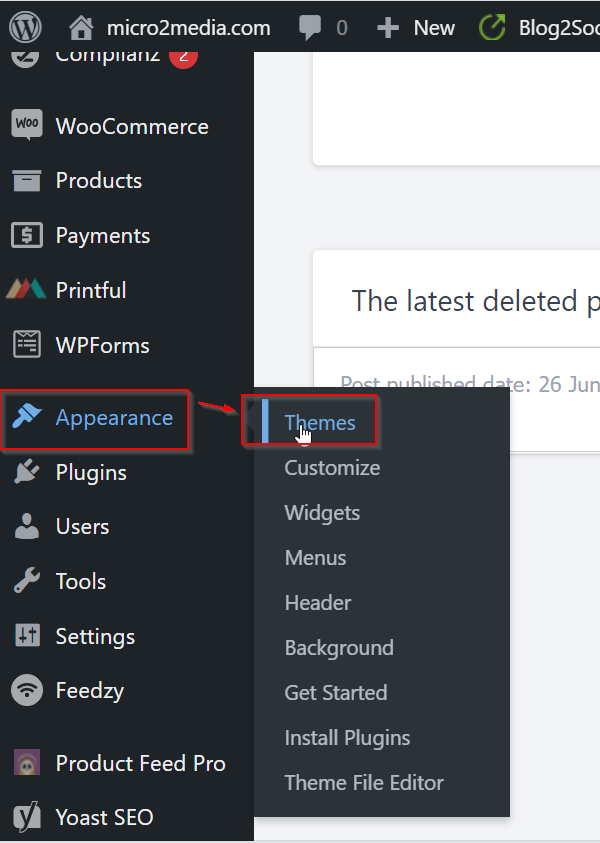
Click on “Add New”:

Then 2 options are available, either uninstalling a compressed theme file or search for a theme and install it.
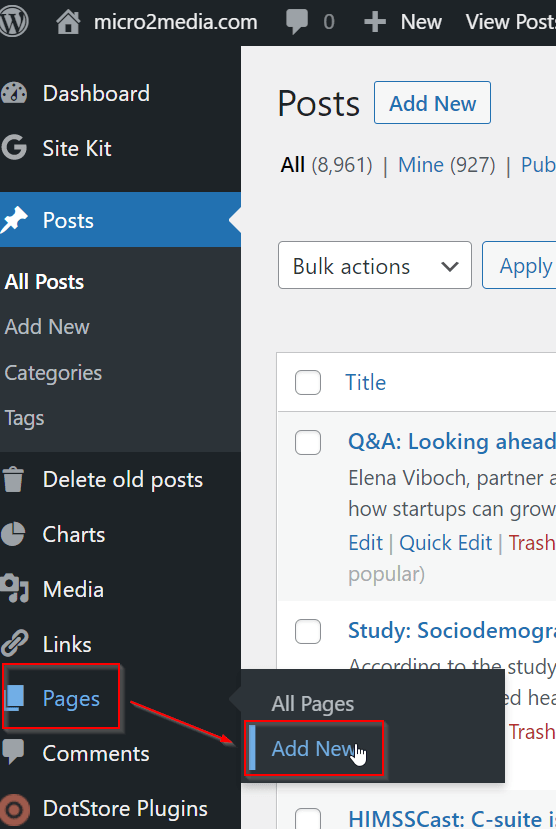
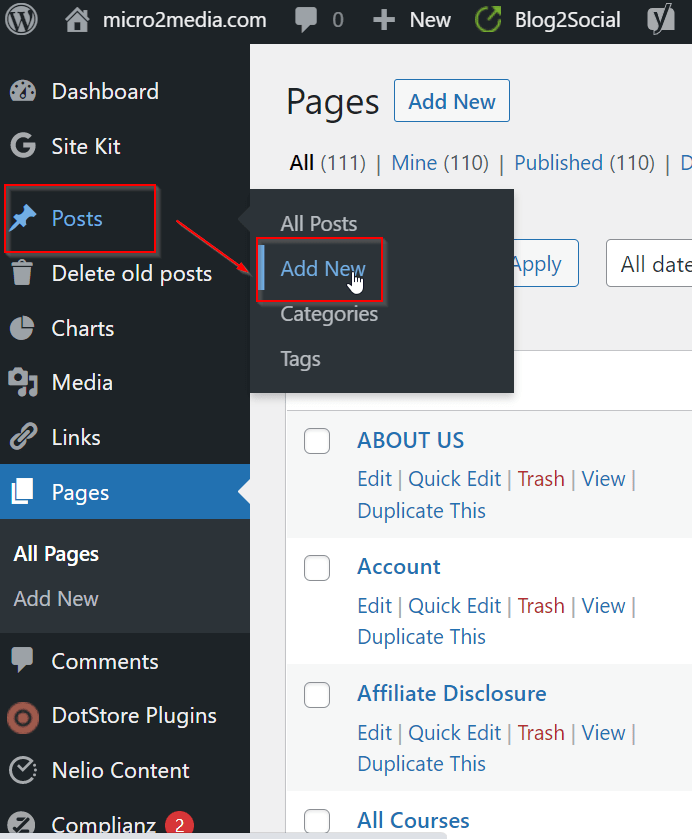
- Set up your pages and posts. To create a new page, navigate to the “Pages” section and click “Add New.” To create a new post, navigate to the “Posts” section and click “Add New.”
Create a new page
Create a new post
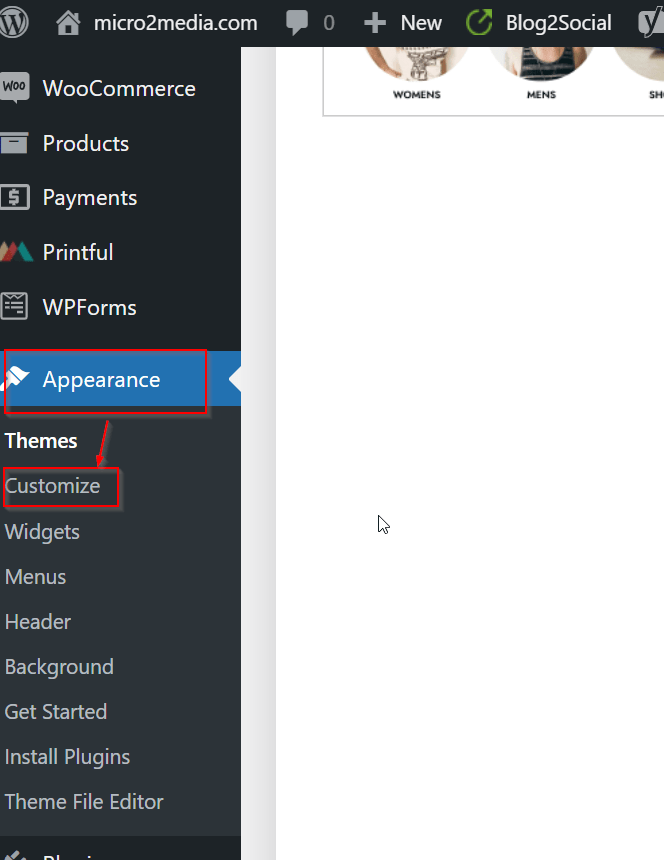
Customize your site’s appearance. You can customize your site’s appearance by navigating to the “Appearance” section and clicking “Customize.” From here, you can change your site’s colors, fonts, and other settings.
You can find free themes below:
- WordPress.org free themes
- WordPress.com free themes
- Athemes.com free themes
- NicePage free themes
- Colorlib free themes
Chapter 2: Creating Content in WordPress
In this chapter, we will cover the basics of creating content, including posts, pages, and media. We will also discuss how to add images, videos, and other types of media to your site.
Section 1: Creating Posts
To create a new post, start by logging into your dashboard and clicking on the “Posts” tab in the left-hand menu. Then, click on “Add New” to start a new post.
Once you are on the post editor screen, you can start adding content to your post. Add a title for your post in the top field, and then start typing your post content in the main editor area.
You can also use the formatting options in the editor toolbar to add headings, bold and italic text, and other formatting to your post.
To add images or other media to your post, click on the “Add Media” button above the editor. This will open the media library, where you can upload new images or choose from existing ones.
Section 2: Creating Pages
To create a new page, click on the “Pages” tab in the left-hand menu of your dashboard. Then, click on “Add New” to start a new page.
Once you are on the page editor screen, you can start adding content to your page. Add a title for your page in the top field, and then start typing your page content in the main editor area.
You can also use the formatting options in the editor toolbar to add headings, bold and italic text, and other formatting to your page.
Section 3: Adding Media
To add images or other media to your site, start by clicking on the “Media” tab in the left-hand menu of your dashboard.
From here, you can upload new images or other media files by clicking on the “Add New” button.
You can also manage your existing media files by clicking on them in the media library. From here, you can edit the image, add captions, and choose how the image is displayed on your site.
In your posts and pages, you can add media files by clicking on the “Add Media” button above the editor. This will open the media library, where you can select the image or other media file you want to add.
Recap:
We covered the basics of creating content in WordPress, including how to create posts and pages and how to add media files to your site. We also showed how to use the WordPress editor to add formatting.
Chapter 3: Customizing Your WordPress Site
In this chapter, we will cover the different ways you can customize your site, including themes, widgets, and plugins. We will also discuss how to create custom menus and how to use the WordPress customizer to make changes to your site’s appearance.
Widgets:
Widgets are small blocks of content that can be added to your site’s sidebar, footer, or other widget-enabled areas. They can display information like your latest posts, social media feeds, search bar, or custom HTML code.
To add a widget, go to Appearance > Widgets in your WordPress dashboard. You’ll see a list of available widgets on the left and a list of widget-enabled areas on the right. Simply drag and drop a widget from the left to the right to add it to a widget area.
Plugins:
Plugins are software add-ons that can extend the functionality of your WordPress site. They can be used to add new features, improve performance, optimize SEO, or enhance security.
To install a plugin, go to Plugins > Add New in your WordPress dashboard. You can use the search bar to find plugins by keyword, or browse them by category, featured, or popular. Once you’ve found a plugin you want to install, click on the Install Now button to add it to your site.
After the installation is complete, click on the Activate button to activate the new plugin. Some plugins may require additional configuration, so be sure to follow the instructions provided by the plugin developer.
Custom Menus:
Custom menus allow you to create a navigation menu that links to specific pages, posts, categories, or custom links on your site. You can add or remove menu items, change their order, or create sub-menus.
To create a custom menu, go to Appearance > Menus in your WordPress dashboard. Give your menu a name, select the pages or categories you want to add, and click on the Add to Menu button. You can then drag and drop menu items to rearrange them, or create sub-menus by indenting items below others.
WordPress Customizer:
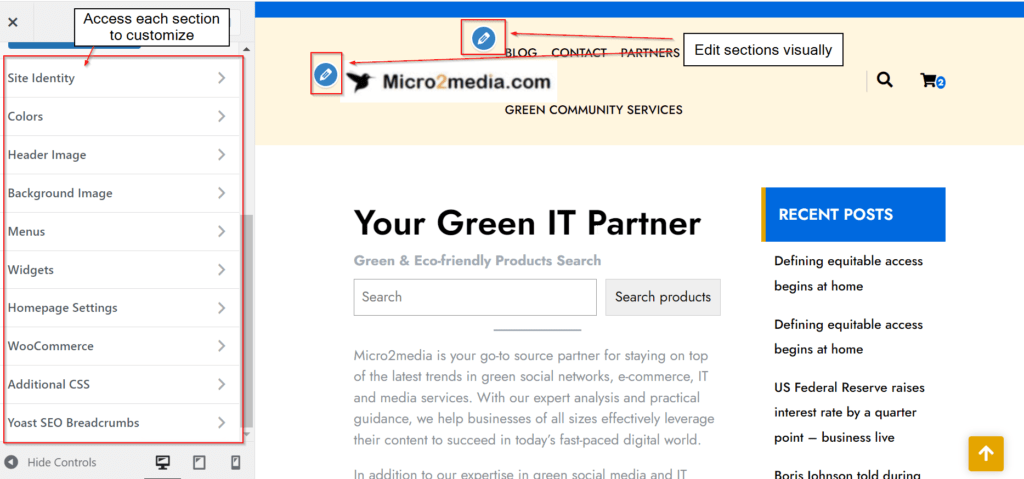
The WordPress customizer is a built-in tool that allows you to preview and make changes to your site’s appearance in real-time. You can change the site title and tagline, upload a logo, adjust colors, fonts, and background images, and more.
To access the WordPress customizer, go to Appearance > Customize in your WordPress dashboard. You’ll see a live preview of your site on the right, and a list of available customization options on the left. Simply click on a section to expand it and make changes.
Example:
Let’s say you want to change the font of your site to something more modern. You can do this by installing a new theme that includes custom fonts or by using a plugin that allows you to add custom fonts.
First, go to Appearance > Themes and search for a theme that includes custom fonts. You can use keywords like “custom fonts,” “modern,” or “minimalist” to find relevant themes. Once you’ve found a theme you like, install and activate it.
Chapter 4: SEO
In this chapter, we will cover the basics of search engine optimization (SEO) for WordPress. We will discuss how to optimize your site for search engines, including how to use keywords, meta tags, and other SEO techniques.
Search Engine Optimization (SEO) is an important aspect of any website, including WordPress sites. In this tutorial, we’ll cover some of the best practices for optimizing your WordPress site for search engines.
Keyword Research:
Before you start optimizing your site, you need to know what keywords to target. Keyword research is the process of finding the right keywords that your target audience is searching for. You can use free tools like Google Keyword Planner, Ubersuggest, or SEMrush to research keywords related to your niche.
For example, if you have a travel blog, you can use Google Keyword Planner to find keywords like “best travel destinations,” “budget travel tips,” or “adventure travel.” Once you have a list of relevant keywords, you can use them to optimize your site’s content.
On-Page Optimization:
On-page optimization refers to the process of optimizing individual pages on your site for specific keywords. This includes optimizing page titles, meta descriptions, heading tags, and content.
Page Titles:
Your page titles should include the targeted keyword and be descriptive and compelling. Use the Yoast SEO plugin to optimize your page titles for search engines.
Meta Descriptions:
Your meta descriptions should be brief summaries of your page’s content, including the targeted keyword. Use the Yoast SEO plugin to optimize your meta descriptions.
Heading Tags:
Use heading tags (H1, H2, H3) to structure your content and highlight important keywords. Make sure your main heading (H1) includes the targeted keyword.
Content:
Your content should be high-quality, informative, and engaging. Use your targeted keyword naturally throughout your content, but don’t overdo it. Aim for a keyword density of 1-2%.
Off-Page Optimization:
Off-page optimization refers to the process of building backlinks to your site from other high-authority sites. Backlinks are a key factor in determining your site’s authority and ranking in search engines.
You can build backlinks by guest posting on other blogs, participating in online forums, and submitting your site to directories. Be sure to focus on high-quality backlinks from relevant sites in your niche.
Technical SEO:
Technical SEO refers to the behind-the-scenes optimizations that improve your site’s performance and user experience. This includes optimizing your site’s speed, mobile-friendliness, and site structure.
Speed:
Use a caching plugin like WP Fastest Cache or W3 Total Cache to improve your site’s speed. Optimize your images for the web by compressing them and using the appropriate file format.
Mobile-Friendliness:
Make sure your site is mobile-friendly and responsive. Use the Google Mobile-Friendly Test to check your site’s mobile-friendliness.
Site Structure:
Use a clean and organized site structure with clear navigation menus and URLs. Use the Yoast SEO plugin to optimize your site structure for search engines.
Example:
Let’s say you have a food blog and want to optimize a post about a new recipe for “Vegan Chickpea Curry.” Here’s how you can optimize the post for search engines:
- Keyword Research: Use a tool like Google Keyword Planner to find relevant keywords like “vegan curry,” “chickpea recipes,” or “easy vegan meals.”
- On-Page Optimization:
Page Title: Use a descriptive and compelling page title like “Easy Vegan Chickpea Curry Recipe | Healthy and Delicious.” Include the targeted keyword “Vegan Chickpea Curry.”
Meta Description: Write a brief and informative meta description like “Looking for a healthy and delicious vegan curry recipe? Try our easy Vegan Chickpea Curry Recipe, packed with protein and flavor. Perfect for a quick and easy weeknight meal.”
Heading Tags: Use heading tags to structure your content and highlight important keywords. Use the H1
tag for the main heading and include the targeted keyword “Vegan Chickpea Curry.”
Content: Write a high-quality, informative, and engaging post about your Vegan Chickpea Curry recipe. Use the targeted keyword naturally throughout the content, but don’t overdo it. Aim for a keyword density of 1-2%.
- Off-Page Optimization: Build backlinks to your Vegan Chickpea Curry recipe post by reaching out to other food bloggers in your niche and asking if they’d like to feature your recipe on their site or include a link to it in a round-up post.
- Technical SEO:
Speed: Use a caching plugin like WP Fastest Cache or W3 Total Cache to improve your site’s speed. Optimize your images for the web by compressing them and using the appropriate file format.
Mobile-Friendliness: Make sure your site is mobile-friendly and responsive. Use the Google Mobile-Friendly Test to check your site’s mobile-friendliness.
Site Structure: Use a clean and organized site structure with clear navigation menus and URLs. Use the Yoast SEO plugin to optimize your site structure for search engines.
In short; by following these best practices for WordPress SEO, you can improve your site’s visibility and ranking in search engines, driving more traffic to your site and increasing engagement with your content.
Chapter 5: WordPress Security
In this chapter, we will cover the basics of WordPress security, including how to protect your site from hackers and other security threats. We will discuss how to use security plugins and other tools to keep your site secure.
Chapter 6: WordPress E-Commerce
In this chapter, we will cover the basics of e-commerce in WordPress, including how to set up an online store and how to integrate payment gateways like PayPal and Stripe. We will also discuss how to manage your inventory and process orders.
As a matter of fact, if you’re looking to set up an online store with WordPress, you’re in luck – there are several great ecommerce plugins available that can help you get started. In this guide, we’ll walk you through the process of setting up a WordPress ecommerce store using the popular plugin WooCommerce.
Step 1: Install and activate WooCommerce
The first step in setting up your WordPress ecommerce store is to install and activate WooCommerce. This can be done by going to Plugins > Add New in your WordPress dashboard and searching for “WooCommerce”. Moreover, once you’ve found the plugin, click “Install Now” and then “Activate”.
Step 2: Configure basic settings
Once WooCommerce is installed and activated, you’ll be prompted to complete a setup wizard. This will walk you through some basic settings, such as your store’s location, currency, and payment options. You can always go back and change these settings later if needed.
Step 3: Add products
Now that your basic settings are configured, it’s time to start adding products to your store. To do this, go to Products > Add New in your WordPress dashboard. Here, you can add product details such as the name, description, price, and images. You can also set product categories and tags to help organize your store.
Step 4: Configure payment and shipping options
Once your products are added, you’ll need to configure your payment and shipping options. To do this, go to WooCommerce > Settings > Payments and WooCommerce > Settings > Shipping in your WordPress dashboard. Here, you can choose which payment methods you want to accept and set up shipping rates for your products.
Step 5: Customize your store’s design
Finally, you’ll want to customize your store’s design to make it stand out and reflect your brand. This can be done by going to Appearance > Customize in your WordPress dashboard and making changes to your store’s theme, colors, and typography. You can also add custom CSS to further customize your store’s design.
Note that examples of successful ecommerce stores built on WordPress include:
- Allbirds – a popular sustainable shoe brand that uses WooCommerce to power its online store.
- Rothy’s – a shoe brand that uses WordPress and WooCommerce to offer a range of eco-friendly shoes.
- Klean Kanteen – a popular water bottle brand that uses WordPress and WooCommerce to sell its products online.
By following these steps and looking to successful examples like these, you can build a beautiful and effective ecommerce store with WordPress and WooCommerce.
Chapter 7: WordPress Multisite
In this chapter, we will cover WordPress Multisite, which allows you to create multiple websites from a single installation of WordPress. We will discuss how to set up and manage a WordPress Multisite network.
WordPress Multisite is a powerful feature that allows you to run multiple WordPress sites from a single installation. In addition, in this guide, we’ll walk you through the process of setting up and using WordPress Multisite.
Step 1: Check if your hosting supports WordPress Multisite
Before you start setting up WordPress Multisite, you’ll need to make sure your hosting provider supports it. Not all hosting providers do, so it’s important to check with your provider first.
Step 2: Enable WordPress Multisite
To enable WordPress Multisite, you’ll need to add a line of code to your wp-config.php file. Hence, this file is located in the root directory of your WordPress installation. Open the file in a text editor and add the following code just above the line that says “/* That’s all, stop editing! Happy blogging. */”:
define(‘WP_ALLOW_MULTISITE’, true);
Save the file and then refresh your WordPress dashboard. You should now see a new option under Tools called “Network Setup”.
Step 3: Set up your network
Click on “Network Setup” to set up your WordPress Multisite network. You’ll need to choose whether you want to use subdomains or subdirectories for your sites, and then enter a network title and admin email address.
Once you’ve filled out these details, click the “Install” button. WordPress will then provide you with some additional code that you’ll need to add to your wp-config.php and .htaccess files.
Step 4: Add new sites
With WordPress Multisite set up, you can now add new sites to your network. Hence, to do this, go to My Sites > Network Admin > Sites in your WordPress dashboard. Here, you can add new sites by clicking the “Add New” button and filling out the necessary details.
You can also manage your sites from this screen, including deleting sites, editing site information, and assigning users to specific sites.
Step 5: Manage your network settings
WordPress Multisite also provides you with a range of network-wide settings that you can manage from the Network Admin dashboard. These include options for user registration, theme and plugin management, and more.
As a matter of fact, to access these settings, go to My Sites > Network Admin > Settings in your WordPress dashboard.
WordPress Multisite is a powerful feature that allows you to manage multiple WordPress sites from a single installation. By following these steps, you can set up and manage your own WordPress Multisite network with ease.
Chapter 8: WordPress Maintenance and Troubleshooting
In this chapter, we will cover the basics of WordPress maintenance and troubleshooting, including how to update WordPress, themes, and plugins, and how to troubleshoot common issues like site crashes and error messages.
WordPress is a powerful platform for creating and managing websites, but it does require some regular maintenance to ensure that it remains secure and functional. In this guide, we’ll walk you through some tips for WordPress maintenance and troubleshooting.
Maintenance Tips:
- Keep WordPress updated: Regularly updating WordPress is critical to ensuring that your site remains secure and free from vulnerabilities. This includes updating not only WordPress itself, but also any themes and plugins that you have installed.
- Back up your site: It’s important to regularly back up your site in case anything goes wrong. There are many plugins available that can help you automate this process.
- Optimize your database: Over time, your WordPress database can become bloated with unnecessary data. Optimizing your database can help improve site performance and speed.
- Monitor site speed: Slow site speeds can negatively impact user experience and search engine rankings. Regularly monitoring your site speed and making necessary optimizations can help improve performance.
Troubleshooting Tips:
- Check for plugin conflicts: Sometimes, conflicts between plugins can cause issues on your site. Try deactivating plugins one by one to identify the cause of the problem.
- Check your theme: If you’re experiencing issues with your site’s design or functionality, your theme may be the culprit. Try switching to a default WordPress theme to see if this resolves the issue.
- Check for errors: If you’re seeing error messages on your site, try to identify the source of the error by looking at the error logs. This can help you pinpoint the cause of the issue and resolve it more quickly.
- Get help from the WordPress community: WordPress has a large and active community of users and developers who can help you troubleshoot issues. You can post questions and get help on forums such as WordPress.org or on social media platforms like Twitter.
Examples of WordPress maintenance and troubleshooting plugins and services include:
- WPForms – a plugin that can help you create custom contact forms and surveys for your site.
- Jetpack – a suite of tools that can help you with site security, performance, and backups.
- WP Site Care – a WordPress maintenance and support service that offers a range of services, including site backups, updates, and security scans.
Regular maintenance and troubleshooting are critical to keeping your WordPress site secure and functional. By following these tips and using the right tools, you can keep your site running smoothly and avoid common issues.
In Short
WordPress is a powerful and flexible tool that can be used to create websites of all types. By following the steps outlined in this online training, you will have the skills and knowledge you need to get started with WordPress and create your own website. Remember to keep learning and exploring new WordPress features to continue to improve and grow your site.
If you need assistance with real-life scenarios or recommendations, please feel free to contact us either HERE or through email at trainings@micro2media.com.